In this post, I’ll go over the architecture behind this static site plus newsletter features, as well as decisions behind the tech used.
Overview
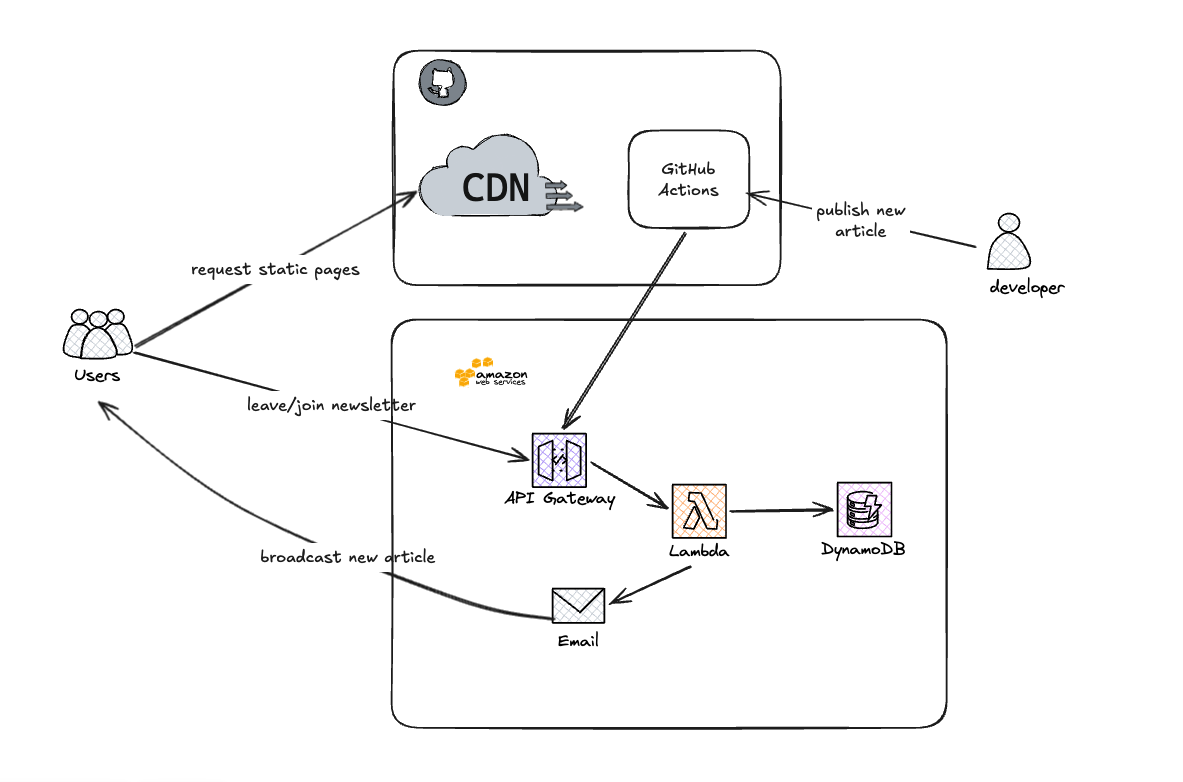
Frontend
The previous site was built with Svelte as a fun project. Since adding a blog, the requirements changed:
- Display page listing blog posts
- Render markdown in page style for individual posts
- Display landing page with animations
- Make it easy to write articles in markdown without changing code
- Make it easy to update animations and styles without rewriting a lot of code
Given these requirements, continuing with Svelte would require creating markdown rendering components and a rendering engine so I could add static assets and convert them.
Svelte also makes it difficult to experiment with animations, since the most efficient and documented code is usually vanilla JavaScript, which integrates well with modern browser APIs.
I chose Hugo for the following reasons:
- great support for blogging and markdown rendering
- blazing fast (always a popular argument)
- built on top of Helm templating engine, familiar to me from backend work
- popular with many extensions
- great support for vanilla JS, HTML, and CSS
I configured my Hugo site by creating a custom theme with vanilla HTML, JS, and CSS, then used the main site only for parameters and markdown content.
For styling, I’m using CSS variables because they’re well-supported in modern browsers and offer excellent extensibility. You build styles on variables and tweaking them in browser developer tools updates the whole design instantly.
Designs
Continuing with CSS styling, I started by copying styles from my previous blog. A few weeks ago, I watched a Fireship video about Stitch.
If you’re unfamiliar, I recommend exploring Stitch. It generates Figma-friendly designs from LLM prompts, letting you iterate via natural language.
Stitch was particularly useful because design has been challenging for me in past projects. Leveraging AI-generated designs provided a practical solution without hiring a dedicated designer.
To set up those designs with existing CSS variable code, I wired up the MCP Google provides and let it update the codebase.
Newsletter
Now for the fun part. The newsletter requirements were:
- Accept low, sporadic throughput to manage the user base
- Provide user list behind a UI for easy review and changes
- Spend $0
Low throughput and sporadic requests are straightforward to solve with modern technology. The real considerations are CPU and memory efficiency, ensuring rapid response times even after days of inactivity.
The best tool I found was AWS Lambda, which not only fits all requirements but offers interesting features:
- I can configure it to scale aggressively if needed
- Very low latency
- Easy to develop
I picked Python because of the amazing boto3 library, which exposes AWS services with a simple SDK.
The hardest part about developing Lambda functions is testing them locally. Fortunately, AWS provides SAM (Serverless Application Model), a CLI tool that solves this.
If you check the repository, you’ll see a complete README (auto-generated with the project) with all commands needed to test locally:
> sam build --use-container
> sam local invoke join --event events/event.json
> sam local start-api
curl http://localhost:3000
Infrastructure
To provision the infrastructure, I used Terraform. This is my preferred tool at work, and using it deepened my AWS knowledge.
The Terraform folder has modules to simplify provisioning. I created a state-module that sets up an S3 bucket and DynamoDB for remote backend storage.
NOTE: As of Terraform v1.10.0, a new
use_lockfilecan be used instead of configuring a separate database for locking.
I also created a function-module that abstracts provisioning for each Lambda function.
Lambda functions can be deployed in Terraform different ways. My approach uses a compiled .zip file that gets hashed and encoded before submission to AWS. I’ll explain this decision in the automation section.
Once you’ve deployed the Lambda functions, you need to provision a REST API on API Gateway for external access.
Here’s the full list of building blocks without getting lost in implementation weeds:
- API Gateway REST API
- API Gateway Resource
- API Gateway Deployment (one per Lambda)
- API Gateway Stage (one per deployment)
Per Lambda:
- API Gateway Method
- API Gateway Integration
- Lambda Function (code)
- Lambda Invoke Permission
And the shared infra:
- DynamoDB (user list storage)
- IAM Policy
- IAM Role (with policy attachment)
- SES (Email) template for the broadcast function
Finally, configure extra functions and responses for CORS policies since the Lambda won’t run in the same domain (GitHub Pages CDN hosts the domain).
Automation
We could automate the deploy, but only JavaScript animations, design, themes, and new articles change continuously. For this reason, I compile the Lambda locally and run Terraform locally to avoid exposing AWS credentials to potential supply-chain attacks.
The only automation is a simple GitHub Action that calls the broadcast function whenever a new article is added or updated in /content/posts.
Conclusion
That covers the implementation of this site. Feel free to clone and experiment with the code locally if you’re curious. If you have questions or suggestions, open an issue or reach out directly.